Wednesday 17 April 2013

My new venture

I am officially a working mum.

The paperwork is all in order and I can now confirm that I am self-employed and I have a home bakery business. I am so excited by this!

I have created a new blog for my new business The Cinque Ports Patisserie, please check it out.


Due to Environmental Health registration rules I can't actually start producing baked treats in my business capacity until June 1st, but as soon as that date is here I shall be cooking up a commercial storm in the kitchen.

Monday 10 December 2012

Spiral Christmas Hanging


I've been away for a while, doing lots including making Christmas gifts and working on the Never Ending Baby Blanket.


Well, this morning I decided that my dining room needed an extra bit of decoration, and as I had a few spare baubles I decided to make a hanging decoration to go in the centre of the ceiling. I also remembered to take some photos to help you to be able to make your own if you want to!


My was very low cost as I used the lid from a recycled pizza box, a spare scrap of wrapping paper, some fishing wire from my craft box and the spare baubles that wouldn't fit on this year's tree.


Gather your supplies

Using a plate as a guide, cut your circle out

Wrap your circle with paper

Using a sewing needle, thread your wire through
the circle in your desired pattern.
I used an inward spiral shape for mine.
Secure on the uncovered side with tape.
Remember to increase the length of your wire for each bauble!

Tie your baubles on to the other end of the wire,
and hang in location!


Wednesday 28 November 2012

Backpack with built in reigns

I haven't had a lot of time lately to finish anything worth showing to you. My free time has been spent working on the Never Ending Baby Blanket and a tea cosy for my mother and father-in-law, which I will do a whole post on when it is finished.

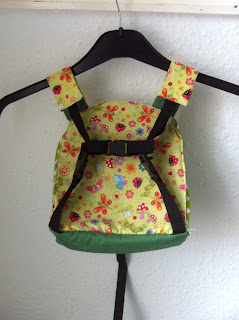
Today, I have decided to share with you a little backpack and reigns combination that I made for my 2.5 year old. I wanted to make him something that he would be willing to wear, as well as solve the problem of him running away now that he is no longer in a pushchair.

To start with, I drew up a pattern and cut out all the pieces from thin craft foam sheets. I had them handy, I wasn't using them for anything else and they were perfect to give the little backpack a lot of stability. I then used those foam pieces to cut out the fabric, added some webbing straps and a few buckles from an old broken backpack belonging to my husband, and voila! 


I incorporated a little chest strap and buckle to stop the little so-and-so from being able to slip free of his bag.


I made this a few weeks ago. It fit perfectly and looked so cute when he put it on. The only problem is that the little tyke won't actually wear it outside of the house. Which, of course, defeats the whole point of the design! 

Sunday 25 November 2012

A little help for a 4 year old

Alphabet Practice Sheets

Last week we had our 4 year old son's first ever Parent's Evening. To say that we came away as proud-as-punch would be an understatement. His teacher was brimming with enthusiasm about our firstborn. I'm smiling just thinking about it!

It was such a relief to hear that he was a model pupil - considering he is like a stroppy teenager at home! Don't get me wrong, he is also very loving and considerate - just not all the time. Apparently at school he is quiet and sensible, something which came as a bit of a shock to hear as he tends to tear his way around our home like a runaway steam train.

There was just one area where he is not doing so good; writing legible letters. Mind you neither is he behind, he's simple not as advanced as he is in other areas. I know he can write, we've got examples stuck all over the kitchen wall; he just refuses to play the part of a performing monkey when asked to display his skills.

So, I have decided that I will try and help him to enjoy writing. I have designed some handwriting practice sheets in the hopes that he'll get a kick out of filling the page and getting a sticker as a reward when he finishes. You never know, right?

Feel free to help yourself to the practice sheets too!

The desire to download an App was overwhelming, but there really are some instances where technological advances really do play second fiddle to good ol' pen and paper.


Saturday 24 November 2012

Another design: My iPad case


I feel like I'm on a bit of a roll at the moment with regards to my sewing machine. In reality it's pure procrastination and avoidance of the Never Ending Baby Blanket, but it's inadvertently and unavoidably productive too!


It was confirmed on Wednesday that my new iPad would be delivered on Friday (yesterday). In anticipation of its arrival I hit my local fabric shop for something cool and funky to house my new toy. I was very pleased when I dug out this fat quarter from amongst hoards of varying fabric designs. It's not my usual style but I felt a need to leave my comfort zone for once and I love the multi-colours.


For another night this week (it's getting to be a habit now) I grabbed the laptop and started designing a pattern from scratch. I have so many ideas in my head but no idea how to transfer them to something that would actually be possible to make. The technical side of design eludes me, I find it difficult to deconstruct my idea into its rawest form. It's a little bit like taking a fully cooked meal and trying to turn it back into its original, separate ingredients -not possible! I am in awe of people that can design things, anything, and make it possible for other people to be able to follow their pattern to produce the desired item.

Anyway, as I was saying - I can't do it! I spent the entire evening drafting out ideas and yet I couldn't get it to pull together into what I wanted. Perhaps I over-think things. I haven't quite managed to make a pattern that would be usable to anybody else, but as soon as I do then I will make it available on this blog.

Well... here is what I ended up with. What do you think?


I have incorporated a PVC pocket within the case so that I can simply unfold and use, without removing the iPad. As you can see from the centre picture, there is also a gap in the side seam so that I can charge my iPad whilst keeping it safely stored in it's case. The PVC hardly effects the sensitivity of the screen and protects it from little fingers and nasty scratches.

I'm very pleased with it, even if the sewing does leave a bit to be desired.

Next on my agenda is a knitted carry bag, but that will have to wait a while as I have a lot of Christmas gifts to make!

Friday 23 November 2012

And the Christmas gifts keep on coming


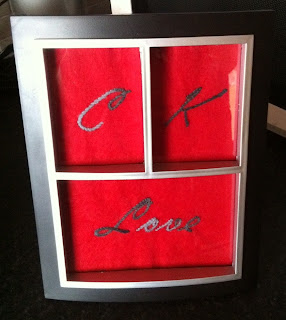
This is a really simple but nice idea to make for a couple. It's definitely something that could be churned out in a free hour. 

I found the frame in Poundland, the felt was in my stash, as was the yarn. The idea was actually my husband's, so I had best give him the credit for it! 

To my surprise when I took the frame apart to trace the shapes I found that the glass was real glass. I had expected plastic in such a cheap frame. It's definitely a bonus having real glass though as it makes it seem like a more expensive frame.

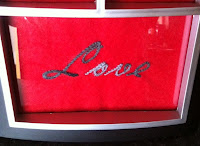
Using my trusty new laptop-lightbox method, I selected the font I wanted to use and enlarged it on the screen to just the right size before then placing my felt over it and tracing with a pencil. The sewing itself is done using stem stitch - which, by the way, I am loving. Apologies for the poor picture, but you should be able to get the idea!


I have added embroidery hoops to my own Christmas list as I have caught the embroidery bug.


On a slightly different note, the iPad case that I promised won't quite be ready for its first public appearance until tomorrow as I haven't had time to cut the fabric yet. I promise though that tomorrow's post will be about it, one way or another. That is to say that it'll either be a "wow, look what I made" post or a "oh no, it didn't quite work out" post. Either way, I will stick up some pictures for you to admire or laugh at.

Thursday 22 November 2012

Chelsey's Bag; the unveiling

Ladies and gentlemen, I present to you my very first sewing pattern Chelsey's Bag. Do with it what you wish, but please do not sell the pattern itself!

Chelsey's Bag consists of a hand and machine stitched felt exterior shell teamed with a machine stitched (although you could hand stitch) cotton interior lining. It is adorned with a pretty little bow and some minor embroidery work. In fact it is my very first attempt at embroidery ever! 

The intended recipient of this particular bag is a very girly little 5 year old but I am sure you could embellish your bag in a more adult fashion if you so wished, perhaps even using alternative fabrics as well.

I am also proud to be able to offer the pattern, completely free of charge for anybody that would like to give this a go. Please let me know how you get on as so far I am the only person to test the pattern, and I would appreciate any feedback that you have.

Might I add that I am so insanely proud of my first attempt at embroidery. I used stem stitch in order to create a lovely "C". I also found a really simple way to trace the letter on to the felt. I simply enlarged it on my laptop screen until it was the actual size that I need, then I positioned the felt directly onto the screen and traced with a pencil as though I were using a lightbox!!


After having such success with the initial, I decided to embellish the handle with a couple of stem stitch parallel lines, and then edged around the flap with the same stitch.

I plan to stuff the bag with some hair accessories and give it to my niece as a Christmas gift.

Yummy scones, thank you James Martin.

Yesterday I made these irresistible scones. My husband knows that if he wants baked treats then he has to work for them. In this case, I was short on eggs for the recipe so off to Tesco he did go!

Thanks to James Martin's scrummy recipe, we have these tasty little numbers to eat our way through over the next couple of days (if they last that long, they really are good!).


I've taken the liberty of including my own pictures as a guide to what the dough should look like after each stage of the recipe, although James' instructions are perfectly fine on their own.


Sieve the bread flour and baking powder into a bowl


Use your fingers to rub the butter into the flour


Stir in the sugar and beaten eggs


Use a wooden spoon to mix in the milk and bring the dough together


Roll, cut, turn and place on a baking sheet, brush with egg yolk


Bake for 10-12 minutes and then place on a rack to cool for a couple of minutes before serving warm with whatever you fancy adding to them!